How to Install UpSide Deck Ceiling Deck Drainage
Installation Tips for a Smooth Deck Drainage Project
Installation Tips for a Smooth Deck Drainage Project
The ever-growing deck trend of 2019 is expanding the usable space in your home with versatile under deck drainage system such as the UpSide Deck Ceiling. Perfect for both new construction and adding to existing decks, UpSide Deck Ceiling features a beadboard design on their channels to provide a flawless look and style above while keeping your guests dry below.
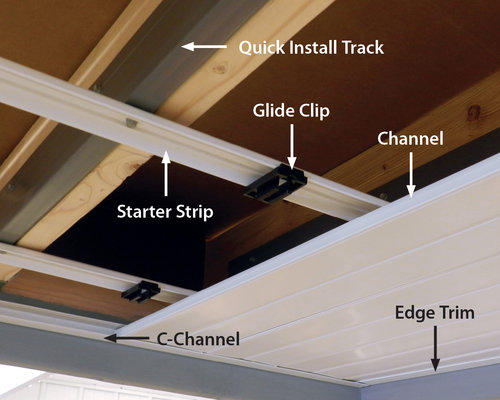
Below is a photo of the UpSide Deck Ceiling system during installation to better show how easy the parts come together to deliver a great water-diverting system:

The Edge Trim and C-Channel create the perimeter of your project by simply mounting directly to your structure. Starter Strips are installed perpendicular to the joists and are attached using Quick Install Tracks for UpSide. On the Starter Strips, Glide Clips are mounted to hold the water-diverting Channels in place for a dry, outdoor living room below.
DecksDirect Pro Tip: Set the pitch for and install your first and last UpSide QITs, then run a level or string across your space for a fast way to keep your slope accurate throughout your lower level.
DecksDirect Pro Tip: When mounting the UpSide Edge Trim component, a helfpul note to keep in mind is that the top side of the Edge Trim features the one single leg with openings for attaching to the structure.
The UpSide Deck Ceiling System a perfect afternoon or weekend project for any builder level. From DIY-er to professional contractor, the UpSide drainage system will help your home grow along with your family. Check out the video below to see how simple it is to gain an entirely new room:

